Baby Gate Challenges and Hacks
BABY GATE CHALLENGES
IMPORTANT DISCLAIMER
These are specialized installations, attempting to do this yourself will be at your own risk and cost.
By continuing to browse through this article, you agree that you have read and agree to the terms and conditions outlined in this section: Use of Website Terms & Conditions
Here are different scenarios of challenging projects I have completed that might resemble your scenario and provide a possible solution to the challenge you are facing.
SCENARIO 1
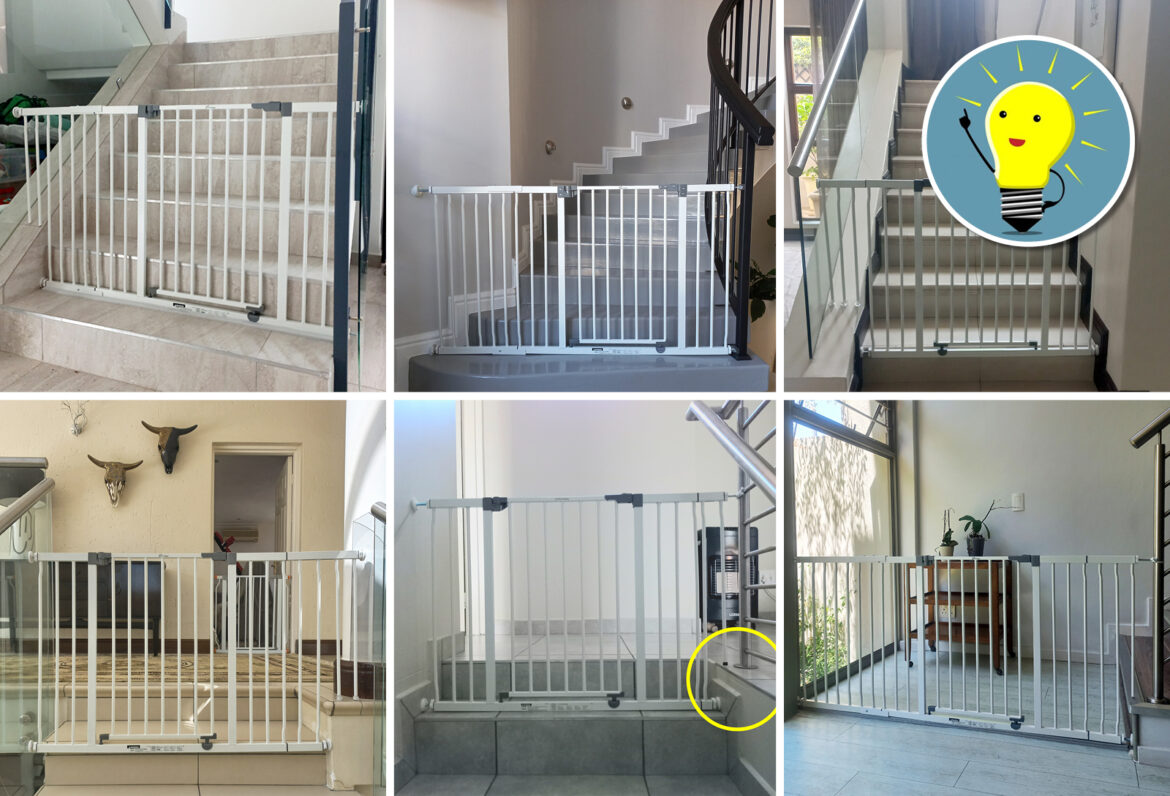
You have an elevated surface on the one side creating an uneven space with different widths top and bottom


STEPS YOU CAN TAKE:
-
- Measure the widest area at the top to work out what size gate and possible extension/s you will need. (CLICK HERE FOR MORE INFO ON MEASURING AREAS FOR BABY GATES).
- Once you have the gates/extensions on hand, you will need an angle grinder with a metal/aluminum disc to cut the gate, ensuring you cut the exact portion off, refer to reference photos above.
- Take out the plastic component from the piece you are going to discard and insert it into the part of the gate where you have cut so that the tension knob fits.
- You will understand this part better when you have the gate on hand.
SCENARIO 2
YOU WANT TO PRESSURE MOUNT YOUR GATE ONTO A SKEW WALL


STEPS YOU CAN TAKE:
-
- The gate/extensions should already be installed.
- Use Pratley Putty Quickset to fill the gap and build up the wall.
- Allow the the Putty to set properly BEFORE tightening the tension knobs for the gate to pressure mount securely.
- Do not rely on the gate as a safeguard until all above steps are complete and you have tested the gate yourself.
SCENARIO 3
YOU WANT TO INSTALL A BABY GATE OUTDOORS
Installing baby gates outside as a budget, quick effortless, and temporary solution.
This will forfeit your warranty on the gates.


I only suggest installing baby gates outside as a budget, quick effortless, and temporary solution for clients. This will forfeit your warranty on the gates.
-
- Baby Gates are for indoor use and are not meant to be installed outside due to inclement weather conditions.
- Above is outlined in the warranty documents that are included in the packaging.
- Without following the warranty guidelines, the warranty will not apply.
For a more permanent solution, you would need to get in a contractor that specializes in security or latching gates. This can be expensive, but it is advisable.
STEPS YOU CAN TAKE:
TREATING THE BABY GATE AND EXTENSIONS FOR OUTDOOR USE:
Disclaimer: None of these precautionary measures are fully rust proof, it will only prolong the longevity of the gate in South African weather conditions.
However, by treating it regularly and effectively, once every 1-2 months, you can prevent rust from forming completely.
Prevent rust and possible water build-up, by following these steps:
-
- Treat the baby gate, extensions, and mounting kit, BEFORE you install it, covering the surface areas at the bottom as well.
- Drill holes into the bottom of the gate, underneath the gate with an 8mm steel drill bit. This is to prevent water from collecting inside the gate; the gates are hollow inside, and rust can start building up from the inside. Water seeps in where the joints, connecters and tension knobs are, collecting inside the gate. The holes allow for ventilation and moisture build up.
- Spray the baby gate, extensions and mounting kit, with a light coat of Rustoleum Painters Touch 2X Ultra Cover – Satin Clear 340g, available on takealot.com.
- Allow to dry thoroughly (2 hrs), followed by a second coat.
For rust that’s already started forming:
-
- Spray the affected areas with Rust-Oleum Rust Reformer 291g, available on takealot.com. Follow the products instructions.
- Read the product description on takealot.com as you may need to purchase mineral spirits, this is a paint thinner to clean up the overspray (areas that are not rusted, that may have been sprayed while treating the rusted areas.)
- The rust reformer turns the rust into a black colour, so you will need to coat it with Rust-Oleum Stops Rust Enamel Gloss White 340g, available on takealot.com.